

Ever taken that first sip of homemade eggnog and instantly felt like you just got a warm hug from the holidays? Yeah, same here. There’s something about that rich, creamy blend of eggs, milk, sugar, and a splash of something fun (wink wink) that turns any chilly evening into pure festive bliss. Forget the store-bought cartons—they’re convenient, sure, but IMO they taste like someone whispered “eggnog” over a cup of milk. If you’ve ever wanted to make the real deal, this guide’s for you.
Grab your whisk (or your electric mixer if you’re fancy) because we’re about to make Classic Homemade Eggnog that’ll make your guests think you have a secret family recipe.
Why Homemade Eggnog Is Worth the Effort
Let’s be honest—making eggnog at home can look intimidating. Raw eggs? Tempering milk? What even is nutmeg? But once you make it from scratch, you’ll never go back.
Here’s why homemade eggnog completely destroys the store-bought stuff:
- Freshness: You know exactly what’s going in—no weird preservatives or unpronounceable ingredients.
- Customization: You decide how thick, how sweet, and how boozy it gets.
- Flavor Explosion: Fresh nutmeg and real vanilla transform it from “meh” to mind-blowing.
And the smell? Imagine Christmas cookies, cozy fireplaces, and good decisions—all rolled into one mug.
Ever wondered why everyone’s grandma insists on “real” eggnog? It’s because once you taste the homemade version, the commercial stuff starts tasting like disappointment.
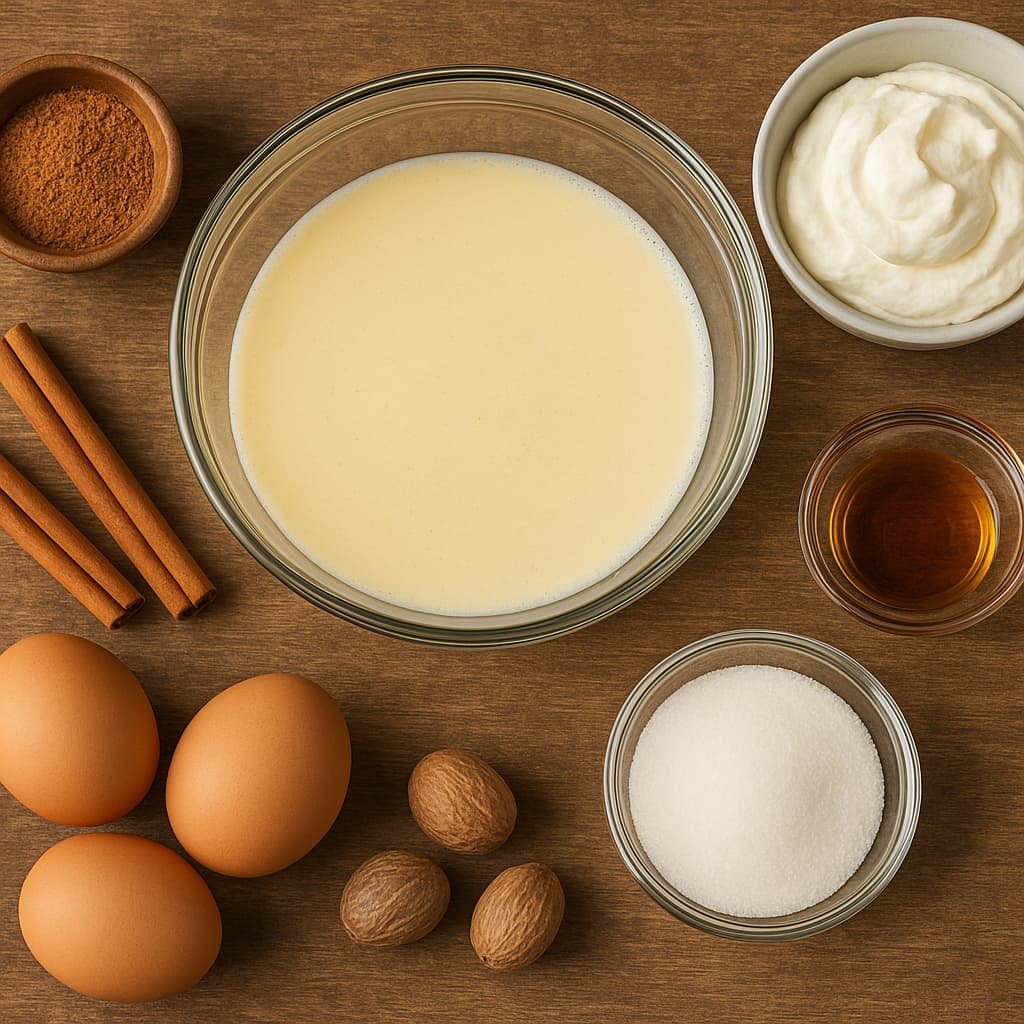
What You’ll Need: Ingredients That Make the Magic
Making classic homemade eggnog doesn’t require a chemistry degree—just a few pantry staples and a sense of adventure.
The Core Ingredients:
- 6 large eggs – The foundation of all that creamy goodness.
- ¾ cup sugar – Sweet but not toothache-level sweet.
- 2 cups whole milk – Don’t even think about using skim milk.
- 1 cup heavy cream – Because decadence is non-negotiable.
- 1 teaspoon freshly grated nutmeg – The secret weapon.
- 1 teaspoon vanilla extract – Rounds out the flavor beautifully.
- A pinch of salt – Enhances all the flavors like a background singer in a hit song.
Optional (But Highly Recommended):
- ½ to 1 cup bourbon, rum, or brandy – For when you want your nog to “speak louder.”
- Whipped cream and extra nutmeg for topping – Because presentation matters, right?
Ever seen someone pour eggnog and it glides like velvet? That’s the result of good ingredients and perfect technique.
Step-by-Step: How to Make Classic Homemade Eggnog
Alright, apron on—time to make magic happen.
Step 1: Whisk the Eggs and Sugar
In a medium bowl, whisk eggs and sugar until the mix turns light, frothy, and slightly pale. This step builds the base of your nog’s silky texture.
Pro tip: Use a hand mixer if you don’t want your arm feeling like it went through an arm-day workout.
Step 2: Warm the Milk Mixture
In a saucepan, gently heat the milk, cream, and nutmeg over medium heat. Don’t boil it—just get it to that cozy, steaming point. If it starts bubbling, you’ve gone too far.
Remember: we’re making eggnog, not scrambled eggs in milk.
Step 3: Temper the Eggs (The Fancy Part)
Now for the part that freaks people out—tempering. Slowly pour a little of the hot milk mixture into your eggs while whisking constantly. This gradually raises the eggs’ temperature without cooking them.
Once you’ve added about a cup of hot milk to the eggs, pour everything back into the saucepan. Stir gently over low heat until the mixture thickens slightly.
It should coat the back of a spoon, not look like a pudding cup exploded in your pot.
Step 4: Add Flavor & Chill
Remove the pan from heat, then stir in vanilla extract (and booze, if you’re living your best life).
Let it cool to room temperature, then refrigerate for at least 2–3 hours. Overnight is even better—the flavors mingle and get richer with time.
Step 5: Serve & Impress
Pour into glasses, sprinkle with fresh nutmeg, and top with a bit of whipped cream. That’s it. You’re now a certified eggnog master.
Raw Eggs vs. Cooked Eggnog: The Great Debate
Ah, the internet’s favorite holiday argument—to cook or not to cook?
If you’re Team Raw, you’ll argue that the flavor is smoother and more traditional. If you’re Team Cooked, you’re all about food safety. Both camps have a point.
- Raw Eggnog Pros:
- Super silky and light.
- Tastes closer to vintage recipes from the 1800s.
- Raw Eggnog Cons:
- Risk of salmonella (yikes).
- Shorter shelf life.
- Cooked Eggnog Pros:
- Safe for everyone to drink (including Grandma).
- Thick and custard-like texture.
- Cooked Eggnog Cons:
- Slightly less airy than raw versions.
IMO, go with the cooked method. It’s foolproof, safe, and still ridiculously good. Plus, who wants to explain to dinner guests why they spent Christmas Eve hugging the toilet? :/
The Boozy Question: How Much Is Too Much?
Let’s talk about the elephant in the room—or rather, the bottle in your hand.
Eggnog without alcohol is totally fine (especially for kids). But add a splash of bourbon, rum, or brandy, and suddenly your holiday spirit gets, well, spirited.
Recommended ratios:
- Light buzz: ½ cup booze per batch.
- Classic party level: ¾ cup.
- “I forgot my in-laws were coming” mode: 1 full cup.
Bourbon gives warmth and depth, rum adds sweetness, and brandy brings a refined kick. Want to experiment? Try a combo—half bourbon, half dark rum. It’s liquid holiday courage in a glass.
Texture Troubleshooting: When Things Go Wrong
Even seasoned home cooks occasionally mess up their eggnog (guilty as charged). Here’s how to fix the most common issues:
- Eggs scrambled? You probably heated too fast. Strain through a fine sieve and pretend it never happened.
- Too thin? Chill it longer—egg proteins thicken over time.
- Too thick? Whisk in a bit of milk to loosen it up.
- Too boozy? First of all, define “too boozy.” 😉 But okay—add a splash of milk and sugar to balance it.
Cooking is about recovery as much as perfection. The best cooks just look calm while they’re panicking inside.
Make-Ahead Tips: Because Nobody Wants to Stress on Christmas Eve
Good news: eggnog actually tastes better the next day. So yes, you can absolutely make it ahead of time.
- Fridge life: Up to 3 days if cooked, or 1–2 if raw.
- Storage tip: Keep it in an airtight jar or bottle so it doesn’t absorb fridge smells (nobody wants eggnog à la leftover lasagna).
- Shake before serving: Separation is normal—just shake it like you mean it.
Bonus: if you make a big batch, you’ll have ready-to-pour happiness on demand all week.
Serving Ideas That Elevate Your Eggnog Game
Sure, eggnog is amazing on its own, but why stop there? Here are some creative ways to enjoy it:
- Eggnog Latte: Mix with espresso for a holiday caffeine boost.
- Eggnog Pancakes: Replace some milk in your pancake batter—instant Christmas breakfast.
- Eggnog French Toast: Soak your bread in eggnog for the coziest breakfast ever.
- Frozen Eggnog Pops: Pour leftovers into popsicle molds for a cold twist.
Ever thought about eggnog ice cream? Yeah, it’s a thing—and it’s dangerously addictive.
Vegan or Dairy-Free? Don’t Worry, I Got You
You can totally make an egg-free, dairy-free eggnog (yes, that sounds like an oxymoron, but it works).
Try This Combo:
- 2 cups almond milk or oat milk
- 1 cup coconut cream
- ½ cup maple syrup or sugar
- ½ teaspoon turmeric (for color)
- 1 teaspoon cinnamon and nutmeg
- 1 teaspoon vanilla extract
Blend everything until creamy, chill it, and voila—nog without the eggs. It’s surprisingly rich and cozy, even if the name “eggless eggnog” makes you giggle.
Common Questions About Eggnog (You Probably Thought About These Too)
1. Can I make eggnog without alcohol?
Absolutely! Just skip the booze and maybe add a little extra vanilla or spice for depth.
2. Can I freeze eggnog?
Technically yes, but the texture changes when thawed. It’s fine for baking later though.
3. What’s the best alcohol for eggnog?
Bourbon if you want smooth warmth, rum for a tropical note, or brandy for old-school elegance.
4. Why does my eggnog taste too eggy?
You might’ve used too many eggs or not chilled it enough. Cooling mellows the flavor.
5. Can kids drink it?
Of course—just skip the alcohol and make sure it’s cooked.
The Secret Ingredient Nobody Talks About
Ready for a controversial opinion? The real secret to unforgettable eggnog isn’t in the recipe—it’s in the resting time.
When you let your eggnog sit overnight (or even for two days), something magical happens. The flavors blend, the spices deepen, and the texture turns from “good” to “oh wow.”
Think of it as letting your nog marinate in holiday cheer. 🙂
Final Thoughts: Your Mug of Holiday Magic
At this point, if your kitchen smells like sugar and spice, congratulations—you just joined the elite ranks of homemade eggnog creators.
You’ve learned how to whisk, temper, chill, and serve like a pro. You’ve conquered the raw vs. cooked debate and maybe even found your perfect booze ratio. And you did it without the help of any store-bought impostors.
So this year, when someone asks, “Where did you buy this amazing eggnog?” just smile and say, “Oh, this old recipe? Been in the family for years.” 😉
Cheers to you, your whisking arm, and the joy of a mug filled with classic homemade eggnog—the holiday drink that never goes out of style.